fbpx
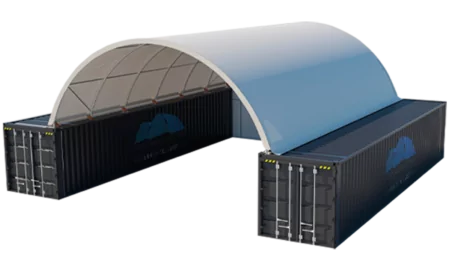
20x20ft 6mx6m container dome shelter with end wall. 3D render 45 degree angle

Building a Shipping Container Dome Shelter

Step-by-Step Guide to Building a Shipping Container Dome Shelter

Step 1: Site Assessment and Shelter Sizing

  1. Evaluate the available space on your property
  2. Consider factors that dictate shelter size:
    1. Property boundaries and setback requirements
    2. Intended use of the shelter
    3. Number and size of items, equipment to be stored
    4. Height restrictions in your area
  3. Choose a shelter size that fits within the building envelope and meets your needs today and in the future. Where possible, it pays to go bigger.
    See our range of 20ft dome shelters and 40ft dome shelters here.

Step 2: Choose the Appropriate Container Shelter Type

  1. Assess your needs and resources:
    1. What is the total available space for construction?
    2. On-hand resources for building (or ability to hire contractors)
    3. Intended use and additional installations such as lighting, ventilation, racking
  2. Consider the shelter assembly types:
    1. Quicklock bolt-together design: Single-trussed shelter attached to containers using clamps, clips, plates, and rails (no welding required)
    2. Single-trussed welded version: Base plates and vertical truss tube connections welded to container roof edge
    3. Double-truss version: Double-up roof frame arches with welded diagonal support tubes for larger industrial shelters 40ft to 70ft wide.
  3. Additions and upgrades
    1. Consider the security and use of the shelter. Will the addition of a full-height, solid end wall be required. If your site backs on to open land or borders with another business, is privacy a concern? Front walls with a door are often required to create a totally weatherproof space, especially if the shelter is used as a workshop featuring electrical equipment and machines. For some business operations, a half wall may be sufficient at the front, back or at both ends of the shelter.

Step 3: Planning and Approvals

  1. Check local council zoning laws and building codes
  2. Apply for necessary planning permissions and local council approvals
  3. Obtain required permits before starting construction
  4. Consult with a local engineer for wind speed limits
  5. Consider a soil test to ensure the ground is well-suited

Step 4: Site Preparation

  1. Clear and level the site, leaving a safe working area around the proposed shelter.
  2. Ensure proper drainage to prevent water accumulation and water run off into the shelter.

Step 5. Shipping and Delivery

  1. QDD can arrange shipping to any location in Australia. We use a network of reliable and capable freight and logistics providers and will shop around on your behalf for the best delivery price we can find.
  2. Pick up from our warehouse in QLD, VIC and WA. Save money by picking up directly from our storage hubs – more on the way.
  3. Taking delivery of a shelter means having a forklift at the delivery location. These shelters are packaged and sealed in metal shipping crates direct from our production facility. Safety is one of our highest priorities, and as such, it is the condition of delivery that customers are made aware of, well in advance.

Step 6: Container Placement

  1. Position two shipping containers (or post sets) parallel to each other using the site set out plans.
  2. Use a combination of string lines and laser levels to ensure accurate alignment between the containers/post sets. Corner to corner diagonal measurements are critical to ensure a perfect set out.
  3. In some high wind locations, anchoring the shipping containers may be a prerequisite. Various methods of anchoring the containers are available such as sinking concrete piers and bolting the containers down using plates and bolts. Adding concrete blocks inside the container acting as ballast can also be an option. We advise you to check with your local engineer for more information on specific wind load tolerances. This is especially important in areas where high winds are prevalent.

Step 7: Engage Competent Personnel

  1. Owing to the design and engineering of the shelters, anyone with basic handyman skills can build one of the smaller shelters, whereas the larger industrial shelters (40ft to 70ft wide) require additional skills and experience. Hire or assign qualified and experienced professional assemblers to complete the construction.
  2. If engaging external contractors, ensure all workers have relevant certifications (e.g., Working at Heights, Construction Induction, Operating an Elevated Work Platform)
  3. Conduct a pre-construction safety briefing for all on-site personnel and be totally aware of what is involved in building the shelter.

Step 8: Develop a Comprehensive Safety Plan

  1. Conduct a job site safety assessment before and during construction.
  2. Create a site-specific emergency response plan:
    1. Include procedures for fires, medical emergencies, and evacuations.
    2. List contact details for key personnel and emergency services.
    3. Provide a site map showing emergency exits and assembly points.
  3. Conduct regular safety briefings and drills.
  4. Ensure all workers know the location of first aid kits and how to use them.

Step 9: Implement Site Safety Measures

  1. Install proper signage to alert others of ongoing construction work.
  2. Set up barriers or fencing around the work area.
  3. Designate specific entry and exit points for workers and vehicles.

Step 10: Provide and Enforce the use of Personal Protective Equipment (PPE)

  1. Ensure all workers wear high-visibility clothing
  2. Provide and require the use of:
    1. Safety boots
    2. Hard hats
    3. Gloves
    4. Safety eyewear
    5. Harnesses for working at heights
    6. Respiratory protection when necessary

Step 11: Establish First Aid Provisions

  1. Place well-stocked first aid kits in easily accessible locations.
  2. Ensure at least one trained first aider is present on-site at all times.
  3. Consider setting up a first aid room for larger projects.
  4. Report any serious injuries to the WHS officer and consider creating a formal report where required.

Assembling the Shelter

Quality Domes Direct supply a range of container and post-mounted dome shelters using varying methods of construction, adaptable for varying requirements and uses.

Types of assembly.

  1. Quicklock : A simple bolt together system with custom engineered clamps and fittings. No special tools are required – just a basic set of metric spanners and sockets.
  2. Welded : The welded version applies to the method of attaching the base of the structure to the top of shipping containers, post and rail sets, or a combination of both. Base plates are welded in place at predetermined intervals along the top edge of the container or base rails. Each base plate has a truss support sleeve and ratchet bracket welded in place. The base of the truss arch fits over the truss support sleeve and both sections are bolted together with high-tensile carriage bolts and flange nuts (no washers needed).
  3. Double Truss : For dome shelters 40ft to 70ft diameter and greater, the double truss design is well-suited. The double tube and welded cross-bracing tubes form a solid and effective truss design, capable of withstanding heaver cover loads, as well as adding strength to the roof frame structure. Double truss dome shelters are available in welded and Quicklock versions (some welding is recommended owing to the size of the base plate and rail assembly.

Step 1: Implement Comprehensive Safety Measures for Working at Heights

  1. Conduct a thorough risk assessment of the work site and surrounding areas before building commences.
  2. Establish a safety perimeter around the construction zone.
  3. Set up appropriate fall protection systems:
    1. Use elevated work platforms (EWPs) where necessary.
    2. Install temporary guardrails on the container roof.
    3. Ensure all workers use properly fitted safety harnesses.
  4. Implement a traffic management plan for on-site vehicles and equipment.
  5. Establish clear communication protocols for all workers.
  6. Assign a dedicated safety officer to oversee the entire construction process.
  7. Conduct regular safety checks and toolbox meetings throughout the project.
  8. Ensure compliance with all relevant Workplace Health and Safety regulations.

Step 3: Additional Safety Considerations

Step 4: Base Plate and Rail Installation

  1. When using two containers, install the Quicklock corner clamps and plate into position, then fit the base rails together and clamp the entire assembly to the container roof. If using post sets and eaves rail as the base, attach the roof structure base rail to the eaves rail using U Bolts. If on-site welding services are available, we suggest tack-welding the roof frame base rail to the eaves rail where the U Bolts are positioned. This simply adds another layer of strength to the roof frame foundation.
  2. When installing a welded base plate version, position the base plates along the top of the container according to the assembly guide. Weld each plate to the top of the container, including a welded connection where the base plate connects with the top rail of the container.

Step 5: Roof Frame Pre-Assembly

  1. Firstly, familiarise yourself with the entire frame sections and components. Develop an understanding of how it all fits together, including identifying the correct nuts and bolts.
  2. Lay out and assemble the steel frame components on the ground first. Take care when walking around the frame and be aware of tripping hazards.
  3. Develop a sound plan of how the truss arches will be lifted and secured into position. Assess the lifting equipment, ropes and slings before installing the arch trusses – safety first.

Step 6: Roof Frame Assembly

  1. Methodically follow the assembly manual to build the frame structure in an ordered sequence. Lift each fully-assembled truss arch into position on each base plate and secure the arch to the base plate truss sleeve with bolts. Connect the first two arches together using Purlins and continue the process until all arches are in place and secured to the base plates. Finally, install cross-bracing supports (where indicated) between the truss arches.
  2. Visually inspect the entire structure for correct alignment. Double check all connections are tight, and no bolts are loose.

Step 7: Cover Installation

  1. Unpack the PVC fabric cover, taking care to keep it as clean as possible.
  2. Choose a clutter-free space to orient the cover the correct way before attempting the installation.
  3. With the cover correctly oriented, spread it out either on top of the shipping container, or lined up with one straight edge of the structure.
  4. Install tensioning tubes into the precut pockets along the bottom edge of the cover. These tubes act as a tie-off point for the ropes which will be used to hoist the cover up and over the frame. The tensioning tubes also allow the cover to be tensioned correctly using the ratchet and strap method.
  5. With the cover in position and sitting evenly on the roof frame, use the ratchet tensioning straps to tighten the cover into position. Use your own judgement as to how tight the cover should be.
  6. Finally, tension the front and rear outside edges of the cover using the tensioning strap that has been sewn into the pocket which runs the entire length of the arch. Secure the tensioning band at both ends using either ratchets or tie-off hooks.

Step 8: Final Adjustments and Inspection

  1. Check all connections, joints and tensioning points are firm.
  2. Make necessary adjustments for proper fit and tension.
  3. Conduct a final inspection to ensure compliance with the approved assembly plans
  4. Arrange for a final inspection from a building surveyor, inspector or engineer.

Step 9: Optional Features

  1. Install end walls, front walls with door, or guttering as required.

Remember to always prioritise safety, follow manufacturer-specific instructions, and comply with all local regulations and industry best practices throughout the construction process.

Latest News

Container Waranty

Quality Domes Direct - Built to Last